-
Out of Office Christmas Special
A rundown on my questionable Crimbo mixing set up
So the Christmas season has officially began and I’m visiting my Mum. What does this mean? For one I’m not paying for food or heating which is great considering the current cost of living crisis. The less exciting news is most of my equipment is still in Manchester (most importantly my studio monitors), and I’ve got to find a way of piecing together something usable for the time being. Fortunately my Mum’s house is a treasure trove of equipment from my teenage years, on top of this, there’s a whole array of high-end Hi-Fi gear my Dad (the original audiophile) collected over the years and I’ve managed to piece together a pretty awesome (if not slightly unconventional) monitoring set up for the holiday season.

To begin with was pleasantly surprised to find out my brother, who is currently off in Costa Rica, has left his Dell monitor, keyboard and mouse here for me to pilfer in his absence so I haven’t suffered too much in terms of displays and accessories. I of course brought my new Universal Audio Volt 4 audio interface along for the ride, without it none of this would have been possible. Beyond the audio interface is where things start to get a little weird.

Yamaha MS50DR Speaker System
Courtesy of Bax Music [Bax-shop.co.uk]Kicking things off we’ve got the Yamaha MS50DR electronic drum kit speaker system from my old DT Explorer kit. I had to do a bit of digging through old boxes to find this 2.1 bass-blasting badboy and it did not disappoint. Featuring two 20W 3-way satellite speakers each with a 4″ woofer, 2″midrange driver and a 1″ tweeter these guys kick out a pretty impressive sound, although maybe lacking a little bass which is to be expected with speakers of this size. The lack of bass is thankfully not an issue thanks to the included 50W 8″ subwoofer, which I’ve been told I can’t turn up any louder because it terrifies the dog. Combined these speakers can reach a pretty excessive volume and with a bit of balancing between the sub and satellite speaker level I’ve managed to get what sounds like a fairly flat response all things considered.

Stewart Tyler of Celef Audio Ltd. building some tasty looking 70s cabinets
Courtesy of Proac [proac-loudspeakers.com]The second set of monitors in the Christmas special selection is the Celef Mini speakers from my old Hi-Fi. These were made in the early to mid 70s and I have tried at some length to find any specs or data sheets for them but it is all but impossible. These where one of Celef Audio’s (now operating under the name Proac) first releases designed by Steven Tyler himself. Picked up for £15 from an Oxfam in Reading by my Dad when I was about 13, these became the centre piece of my teenage sound system, pieced together from my Dad’s old equipment and bits found in charity shops and Ebay. Thanks to the rise of MP3 players and other such digital “advances” in shite-quality audio, the noughties were a fantastic time for gathering a collection of high quality audio gear for pennies, as people traded out their hefty space hogging quality sound systems for pocket sized lossy compression pods with free white earphones.

The Frequency Response of Celef Mini Loudspeakers
Found in a 1976 edition of Hi-Fi for pleasure magazineLong story short the Celef Mini speakers are a serious bit of kit. They kick out a surprising amount of bass for bookshelf speakers and again I’m pleasantly surprised by how even their response is. Paired with an Arcam Delta 60 Hi-Fi amplifier they make a pretty impressive sound. The Delta 60 is a great sounding amplifier and its got super convenient switchable outputs allowing me to easily switch between the Celefs and the Yamaha system. Not to mention it has a mono switch allowing me to check my stereo mixes in mono with the click of a button.
So I’ve managed to get from no monitors to spoiled for choice pretty efficiently with a little bit of digging and a bit of help from my Dad’s excellent eye for an audio bargain. Now I think its time for a glass of wine and a minced pie with Mum before I see if I can find a way of integrating the Mission 762s I spotted in the spare room earlier….
….Merry Christmas!
-
Netflix Surround Sound on Headphones
How to get 5.1 in your cans this Christmas

Image Courtesy of Audioholics [audioholics.com] Wouldn’t it be great if we all had a hefty 7.1.4 sound system to watch all our films on. Full immersive sound every time we switched on Netflix on our laptop. If wherever we were watching, be it our living room, our bedroom or on the train we could get a proper cinema experience. It’s the dream but unfortunately its not really on the cards at the time being. Support for full immersive audio isn’t widespread on streaming platforms particularly on laptop players not to mention you probably don’t have 12 speakers in your living room, let alone your bedroom, and the National Rail service is yet to announce a date for the installation of their immersive audio systems for passengers (at time of writing). Fortunately I’ve been hard at work finding a way of making surround sound accessible for everyone and it’s unbelievably convoluted! So strap in because where we’re going we don’t need roads (that being said 6 channels of internal audio routing will be required).

Image courtesy of Nerdy Tech [nerdytech.com] As with all things there’s more than one way to skin a cat, I’m going to explain the methods I’ve used to get surround sound in my headphones while streaming films from Netflix (unfortunately as far as I can tell surround sound on other steaming platforms such as Amazon Prime or Disney+ is currently unachievable on their desktop apps or web players). Enough chit-chat lets dive in!
Disclaimer: I am a Mac user and although some of these methods will work on Windows or Linux I cannot guarantee every step will translate to different systems.
Unlocking 5.1 in Netflix
Right first and foremost we need to get Netflix to give us some surround sound. Fortunately Reddit and Github user True Dread has done all the heavy lifting here and created a free extension for google chrome. Using the Netflix 1080p extension forces Netflix to display its 5.1 sound options (usually only available on the television app) and as a bonus also allows you to force higher quality 1080p video streaming and prevent quality dips. Full details of how to use the extension can be found on the Chrome webstore page. Once you’ve got that sorted and 5.1 audio enabled on menu on Netflix we’re gunna have to find a way to get that somewhere that can make it a bit more headphone suitable.
Internal Audio Routing
Now we’ve got our multichannel audio we need to get it processed which means we’re going to need to route our main output to a DAW. Thankfully the team at Existential Audio anticipated our needs and have us covered. Blackhole is an open source zero-latency virtual audio driver and is totally free to download. It comes in different forms with different numbers of channels. For our purposes we’re going to need at least 6 channels to support 5.1. Once you’ve got it installed you’re going to want to blackhole as your systems audio output. You will also need to go into the Audio MIDI Setup app and configure speakers in the blackhole output settings to 5.1. Right, so now we’ve got surround sound from Netflix going somewhere we can access it. Time to jump into our DAW.
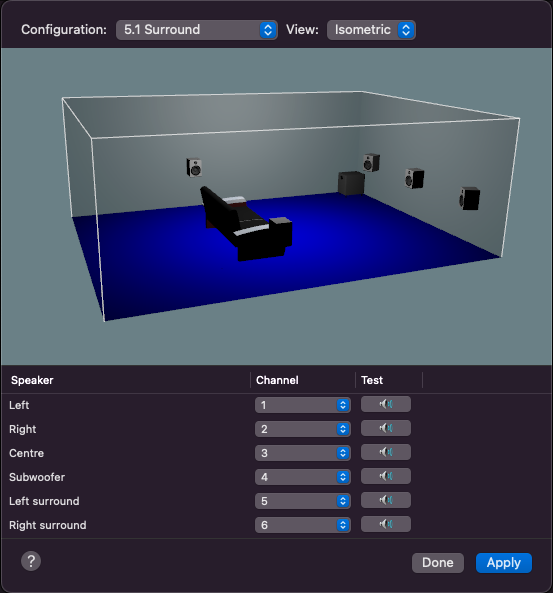
Audio MIDI Setup settings Binaural Processing
There’s a few ways to go about this next part but first of all you’re going to need to get the audio into your DAW of choice. Open up a new project and make sure the input is set to 5.1 surround and make sure the channel ordering is set to the ITU 775 standard set out below:
- Left
- Right
- Centre
- LFE
- Left Surround
- Right Surround
Create a 5.1 audio track and set the input to the blackhole audio drivers first 6 channels. Now we’re going to need to binauralize that surround to get it in your cans. There are a few ways to do this but basically you’re going to need a plug in that can render surround sound binaurally. The best options I’ve come across are Dolby Atmos (If you’re a logic user the built in Dolby Atmos plug in is the only free option on the list), Waves NX Virtual Mixroom or DearVR Monitor. You’ll need to insert one of these on your master bus so that the audio is converted into a stereo format before being output to your headphones.
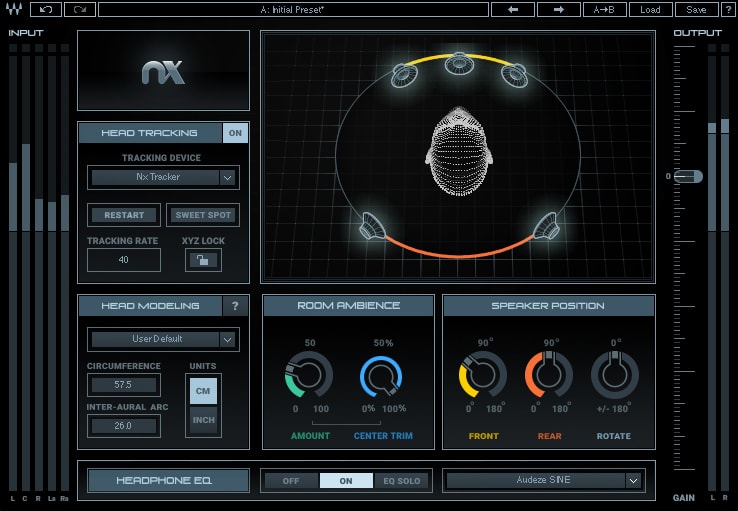
The Waves NX Virtual Mixroom Plugin
Courtesy of Waves [Waves.com]I’ve had great results with Dolby Atmos both using the native logic plug in and the renderer. The spatialisation is great and very customisable. The Waves NX Virtual Mixroom is also a great choice. It offers customisable HRTFs based on your head size and EQ correction profiles for all major headphone brands and models as an added bonus there is an option of purchasing the Waves NX head tracker so that the speaker positions stay stationary when your head moves for increased realism. I’ve not had the opportunity to try the DearVR Monitor plug in although based on the quality of their other immersive audio softwares and fantastic reviews I can only imagine its another excellent option.
I hope this post has given you the tools you need to start enjoying a more cinematic Netflix experience from the comfort of home this winter season. If you have any questions or any other ideas or methods of how to improve this method do let me know in the comments.
-
Patching with Bae
Producing the first episode of a brand new podcast
Over the last month me and Matt Pennington have been hard at work doing our research on the history of and ins and outs of working in Dolby Atmos for the first episode of our new podcast “Patch Baes”. If you’ve been following my blog over the past few months you’ll know that Atmos and immersive audio are pretty keen interests (borderline obsessions) of mine, so an opportunity to have a good old chin-wag about it with a mic in my face was just what the doctor ordered.

Ray Dolby OBE doing his thing
Image courtesy of Dolby [Dolby.com]Kicking things off the podcast starts with deep dive into the history and achievements of the man himself Ray Dolby. Starting off with the A-Type noise reduction system and then an overview all of Dolby Laboratory’s greatest hits from Dolby Stereo and Star Wars right up to the modern day and the release of Dolby Atmos. After the history lesson me and Matt get into discussion about the many applications of Dolby Atmos, how the system works and how we see it effecting the way we consume audio as well as a few interesting ideas that popped up while we were researching for this podcast.

Dolby Cinema
courtesy of Studio Binder [studiobinder.com]The podcast was recorded in the newly kitted out Studio D in the Newton building at Salford University. It was our first time in this space so in keeping with the Patch Baes moniker we spent the first hour or so working out how to patch Pro Tools to the speakers and our mics to Pro Tools in the slightly confusing Dadman software that’s part and parcel of the Avid HDX system. Once we’d overcome this hurdle we got to work recording our ranting and raving for a couple of hours. Fortunately after extensive editing we found about 17 minutes of material that was almost cohesive and mostly factually accurate. An unprecedented success!
This podcast was created as part of our MSc Audio Production course at Salford University. Original music was produced and performed by Matt Pennington. Watch this space for more episodes in the coming months!
-
Building Binaural Worlds
A look at some of the spatial tools available today
For some time now I’ve been experimenting with different binaural mixing tools in a variety of formats. Luckily in 2022 there’s a breadth of tools out there (many free of charge) that not only make binaural mixing possible but also make getting to grips with it extremely easy and accessible. In this post I’m going to give an overview of a couple of the free tools available that I’ve used in the past as well as talk a bit about my experiencing mixing a binaural soundscape in the Dolby Atmos Renderer.
Logic Pro X Binaural Panner

Image courtesy of Sound on Sound [soundonsound.com] Starting off with one for Logic users we’ve got Logic Pro X’s built in binaural panner. This was my first experience of binaural processing and I have to say it’s still one of my favourites to use. Allowing control of distance, elevation, azimuth, stereo spread as well as vertical dimensions the Logic Binaural Panner gives the user a lot of control and the fact that it comes built in to the DAW makes it all the more impressive. The panner is easily accessible by right clicking the stereo/balance panner on any track which means you can integrate binaural processing seamlessly into your workflow. The obvious downside is that you need to be a Logic user (and by proxy a Mac user) to have access to this method of immersive mixing. DAW preference is definitely going to be a deal breaker here for some but from the selection of tools I’ve tried this panner gives the most spatial control of any free binaural processor. Logic also includes an integrated Dolby Atmos Renderer that can be used to mix binaural and multichannel formats (more on this in a bit).
DearVR Micro

Image Courtesy of Dear Reality [dear-reality.com] Dear Reality are big players in the 3D audio and virtual reality industries. Just a quick glance over the variety of professional spatial audio tools they offer will tell you why. DearVR Pro is their flagship spatializer software and a stripped down version of this DearVR Micro can be yours absolutely free of charge. Even in its Micro form DearVR offers amazing spatial control of your sound sources giving users control of azimuth, elevation, width along with control of your simulated room reflections type, size and level. There is also a handy focus knob which allows you to decide how much HRTF effect you would like applied to a sound source which is great if you want to preserve the overall tonal balance of your immaculately designed sound. The inclusion of a distance control would be a nice addition, although convincing distance effects can be produced with a bit of balance between your gain and the level of your reflections. Dear Reality also offer their ambisonic toolbox DearVR AMBI Micro as a free download providing ambisonics processing for a variety of formats including binaural. The tools on offer from Dear Reality are compatible with any DAW and are an excellent choice if you want to give binaural mixing a try. Their paid-for professional range offer even more control and spatial wizardry.
Dolby Atmos Renderer

Action shot of Atmos rendering my binaural soundscape Since Dolby Atmos hit the scene in 2012 it has fast become a staple for theatrical releases and is becoming increasingly integrated into the music and broadcast industry. It can also be used to create some pretty awesome binaural mixes. Getting your head around Dolby Atmos is definitely a steeper learning curve than using the binaural panners I mentioned previously. The object-based audio system means you need a reasonable understanding of signal flow just to get your DAW and the Renderer talking to each other. Once you get it going though the spatialisation and control is pretty amazing.

The panner in pro tools (or your DAW of choice) allows great control and automation of position, distance, height and size. There is further control of distance in the renderer’s binaural setting on top of the 3D panning. The great thing about Dolby Atmos is because the processing is object-based the final mix can be rendered for binaural or any multichannel format. It is of course worth mentioning that the renderer is not free like the other software mentioned, although there are trials available if you are interested in trying it out. Logic users also benefit from a fully integrated Dolby Atmos Renderer built in to their DAW. The integrated Renderer in Logic does have some limitations, it can’t export or import Dolby Atmos Master files but, it does support ADM.BWF a cross platform object-based format.
My experience of working with Dolby Atmos was a little rocky at first (it took me the better part of a morning just getting it to work) but once I got my head around the beds and objects it was a truly enjoyable experience working with the renderer. The sound and spatialisation really takes your binaural mixes to the next level. The visual displays are great as well offering real time tracking of your sources in 3D space. I’ll definitely be working with the Atmos Renderer on many of my projects in the future.
Below is my Atmos powered creation “Terraforma”. Wear headphones to enjoy the full spatial effect. I’ll go into the process of creating Terraforma in more depth in my next post so watch this space for more.
-
Personalised HRTFs
Binaural rendering designed with your melon in mind

Image by Dolby [dolby.com] One of the major issues that has plagued binaural audio since day one is the fact that we’ve all got completely different sized heads. Binaural processing and recording works by imitating what are known as HRTFs (Head Related Transfer Functions). Simply put HRTFs are the way we localise sound sources using a combination of different cues derived from timing and intensity differences between both ears as well as acoustic shadowing and filtering caused by our head, shoulders and pinnae (scientific name for your ear flaps). Currently binaural processing generally works based on a default set of “one size fits all” HRTFs that are generally found to work for a wide range of people. Unfortunately for some people (presumably those of us with weird heads) the 3D effect of binaural audio is wildly inconsistent and sometimes just doesn’t work at all. This is where personalised HRTFs come in.

Camera array set up to create HRTFs through simultaneous photography
Image by AES [AES.org]The idea of personalised HRTFs has been around for as long as binaural recording and processing have. That being said, the idea of being able to get hold of them tailor made without dropping a sizeable wedge of cash or owning a pretty serious collection of cameras and 3D modelling software has, up until now, been a pipe dream. For a little while now Genelec have been offering their Aural ID service providing full HRTF customisation that boasts some pretty impressive features. Their major selling point is compatibility with a whole range of DAWs and third party plug ins as well as with their smart monitor series. Unfortunately your personal Aural ID can only be accessed after paying a pretty substantial monthly subscription cost which is enough to be prohibitive for the majority of us lowly headphone mixers with untreated mix rooms.
A more affordable service providing “personalised” HRTFs is the Waves NX series of plug-ins that offer a range of virtual mixing environments that emulate different stereo and surround speaker set ups. On top of this these plug-ins mimic the impulse responses of famous studio control rooms and have up to 270 headphone correction profiles that cover all major brands and models. Waves also offer a head tracking device that you can clip to your favourite headphones for a more realistic “in the room” spatial experience which sounds pretty awesome. However on the HRTF customisation front they’re lacking a little. They allow you to customise your listening experience based on your head circumference and inter-aural arc (the distance between your ears) but with no measurements to take into account shoulder shadowing or frequency filtering caused by the pinnae they can only offer an approximation of true personalisation.
A particularly cringe worthy ad from Waves for what actually sounds like a pretty awesome product.
This brings us to Dolby. Earlier this year Dolby announced a Beta trial of their PHRTF app. This app was designed to use Face ID functions on modern smartphones to generate personalised HRTFs based on 50,000 points of analysis of the users ears, head and shoulders (which is some pretty clever stuff). After taking your measurements your personalised binaural settings can be downloaded from Dolby’s website and implemented in the Dolby Atmos Renderer application. The big caveat here is that the binaural settings file you download will only be compatible with Dolby’s spatial audio software, although given that Atmos is looking to be the future of 3D sound this may not be as limiting as it first appears. The really great thing here is that the personalisation is free (once you’ve bought the software) which has real potential to level the playing field between established professional studios with high-end, calibrated Dolby Atmos mixing environments and the rest of us who can only dream of such things. In theory PHRTFs should allow for accurate spatial mixing on headphones which could be a total game changer for those working in bedrooms or small project studios. At the very least it should allow us to to mix in a virtual setting that truly reflects the world we hear around us.
The app is still in Beta testing but if you’d like to give it a go you can sign up Here to join the trial.
-
Recording Ambisonics In Thor’s Cave
Going in search of spooky 3D ambiences in the Peak District

Photo Courtesy of [peakdistrictwalks.net] As the sun fell over Manifold Valley in the south of the Peak District last Friday me and my trusty yellow van began our trundling ascent into a dense bank of fog. Somewhere deep in these clouds was our destination, the hillside town of Wetton or more precisely a large rock formation just outside of Wetton called Thor’s Cave. My reason for making this journey was to have a go at getting some 3D ambiences in the cave as well as some impulse response sine sweeps for deconvolution at a later date. In an attempt to avoid the constant low rumble of traffic from Manchester, Sheffield (and the multitude of other cities, towns, villages and hamlets bordering the peaks) I decided the best time to capture these quiet and illusive recordings would be in the dead of night. As such I pulled into the public carpark in Wetton just after 9 O’clock, loaded up my bag with my arsenal of recording equipment, strapped on my head-torch and set off down the dark, muddy path to Thor’s Cave.

Thor’s Cave, Courtesy of [averagelives.com] My choice of weapons for the audio foray were as follows:
- Zoom H6 – My trusty field recorder
- Sennheiser Ambeo VR – A FOA mic for capturing 3D sound
- 2 Rode NT55s – For stereo ambience
- Rode Video-Mic Pro – Always good to have a shotgun mic handy
- A Mic stand and tripod
- A variety of wind jammers
- All manner of cables and connectors
Possibly due to the weight of the equipment on my back or possibly down to the many times I stopped to record owl calls and the sounds of other night time critters it took me a good hour and a half to arrive at the cave. Once I’d arrived and got my equipment set up (which also turned out to be a pretty time consuming task in a wet slippy cave in the dark) I got to recording.
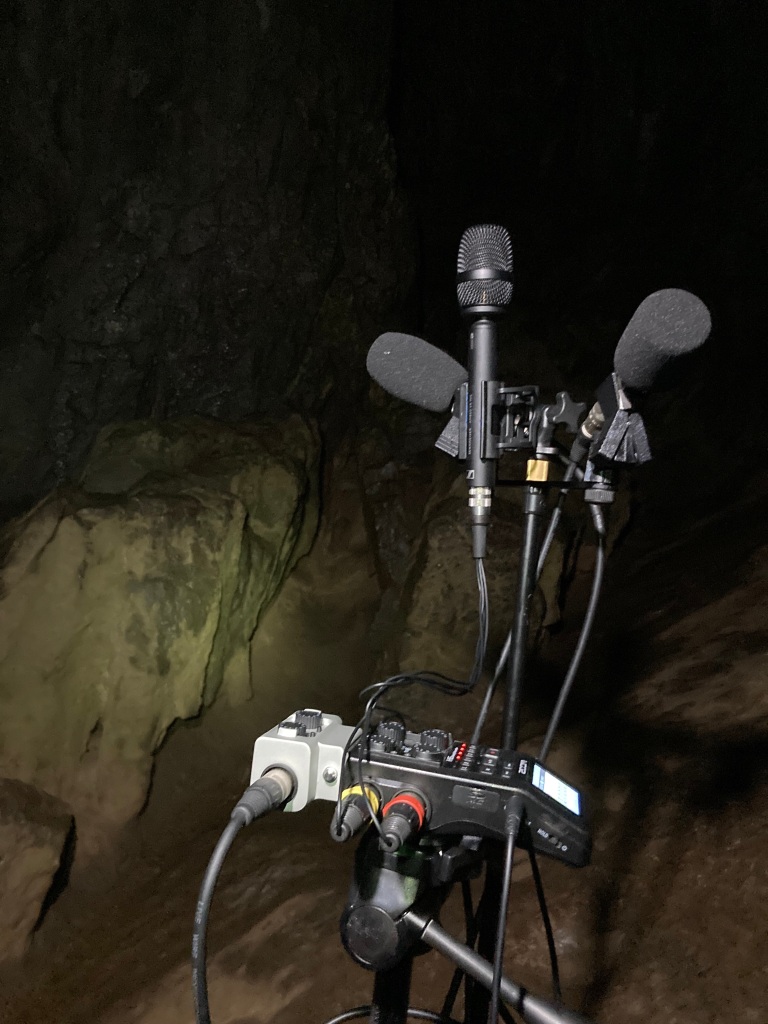
Please excuse the poor quality photo, I opted to use the remaining space in my backpack for snacks instead of a camera.
(This was definitely the right decision)Unfortunately despite my efforts to avoid man-made sounds it would seem that Thor’s Cave sits on almost every flight path in and out of Manchester airport. On the bright side the roar of a plane engine soaked in cave reverb actually sounds pretty cool so all was not lost. If you’d like to have a listen to some ambisonic cave sounds there’s a short excerpt below featuring dingy dripping water, distant owl calls, a plane flying overhead and a far off church bell. I’ve mixed the ambisonic audio to binaural so listen with headphones to get the full spatial effect of the recording.
-
Spaced Out
Recording immersive audio with spaced microphone arrays

Image by Audiophile Review [www.audiophilereview.com] There are some pretty convenient and lightweight options on the market for recording immersive audio these days. Neatly packed tetrahedral ambisonics mics with 4, 9 or 16 channels can give you pretty amazing 360 sound and some like the Zoom H3 VR won’t even break the bank. Does the convenience come at a cost though? Their practical and portable nature necessitates a coincident array and that throws up some problems when it comes to creating a true sense of space.

Core Sound Octomic [https://www.core-sound.com/] So what is a coincident array and how could we do things different? The word coincident basically means occurring together in space and time, so as you’d expect a coincident array involves placing a bunch of microphones in exactly the same place (give or take an inch or so). Our other alternative is what’s known as a spaced array, which is (you guessed it!) microphones with some space between them. Unsurprisingly space and spatial audio get on pretty well and it’s largely to do with space’s old pal time.
In the case of coincident arrays the only localisation cues available are level differences between the different signals. Level differences are more than capable of creating accurate localisation but can fall short of creating a real sense of space. The way we as humans localise sound is using two main cues, level (or intensity) differences and the time differences between sounds reaching each of our ears. Unlike a coincident array there’s a bit of space (a lot in some people’s cases) between our ears and this means that minute differences in the time that audio signals reach us help us determine their position in the space around us.
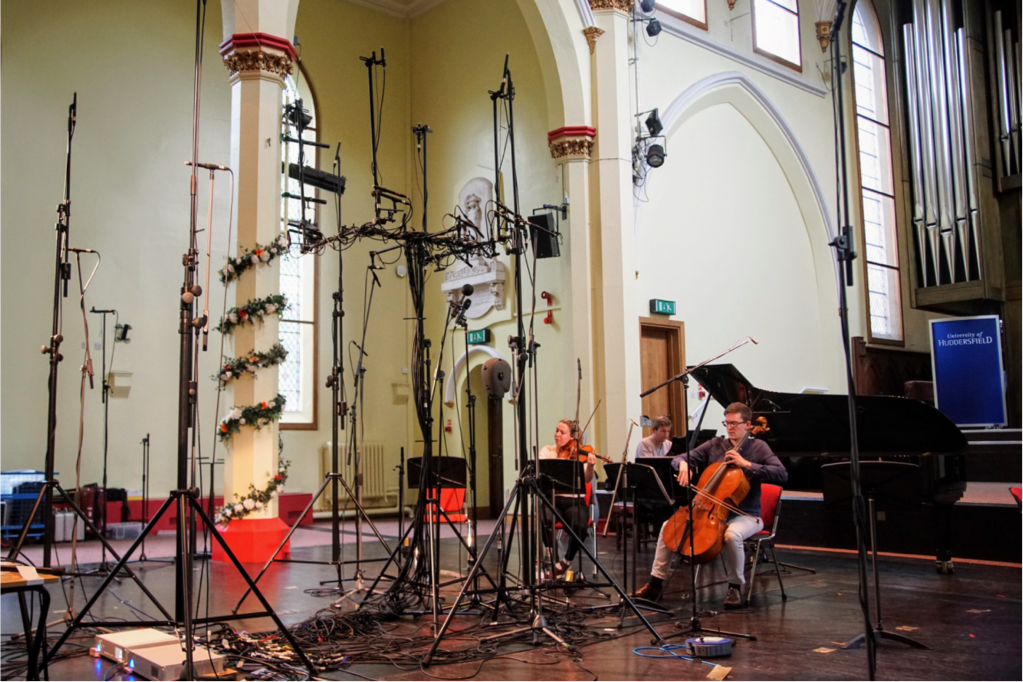
Image from 3D MARCo project [3D Microphone Array Recording Comparison] This is where spaced arrays come in. Putting that bit of distance between the microphones allows for those time differences and decorrelations that create a truly three-dimensional enveloping sense of space. In recreation spaced array recordings also allow for a larger sweet spot and a larger listening field meaning more people can enjoy that spatial goodness. There are of course some disadvantages, mono incompatibility due to phase cancelation and having to lug a whole to of equipment around being the stand outs. If however you only intend to reproduce your recording in multichannel formats and you’ve got more microphones than sense then spaced arrays are clearly the way to go. Check out this video of Dr. Hyunkook Lee rigging up some 70 odd mics in one of the most extreme microphone shootouts of all time.
If you’re keen to find out more about spaced array techniques then I’d highly recommend checking out this article from DPA Microphones with some great explanations of different surround sound arrays.
https://www.dpamicrophones.com/mic-university/immersive-sound-object-based-audio-and-microphones
-
Seeing Sound
How AI is the new ears of the deaf, robots and… …space?

Image by See Sound [https://www.see-sound.com/] See Sound is a new “home hearing system” developed to assist people by hearing increases in volume in their homes and notifying its users of the disturbance. It does this using a massive library of sounds to work out a best match and evaluate a percentage ranking to indicate its degree of certainty. The potential for this technology to help those with hearing impairments or increase the security of our homes is clearly significant and it’s one of the many ways new audio detection AI could change the way we see sound.
When Jawed Karim, Steve Chen and Chad Hurley launched Youtube on valentines day 2005 they probably didn’t realise that they were inadvertently creating an almost limitless data set of video and audio that would become the basis of some pretty serious machine learning. Along with other social media and streaming sites absolutely massive amounts of data have been utilised by algorithms to learn how to detect thousands (if not millions) of sounds impressively accurately. Some of the applications of these well trained algorithms like See Sound are pretty close to home but others are much further reaching.
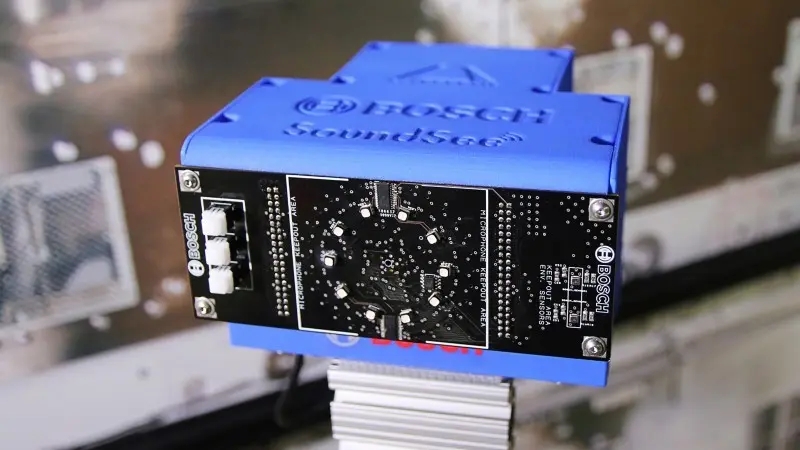
Image by Bosch [https://www.bosch.co.uk/] SoundSee (pictured above) is a device invented by Bosch for use on the International Space Station. The device floats around the ISS mounted on a cube shaped mini robot called an Astrobee. Similarly to See Sound the goal of SoundSee is to detect sounds in the space station that could be of interest or concern such as mechanical faults or defects. The continuous recordings made by SoundSee are sent back to scientists on earth who monitor and analyse the sounds to determine whether machines are experiencing malfunctions or are likely to in the future. For vital systems such as air treatment and lighting these checks are of extreme importance.

Image by NASA [https://www.nasa.gov/] With the ever increasing use of automation in our every day lives it seems likely that we will rely on intelligent audio detection more and more. It could provide a way for self driving cars to detect other vehicles and hazards around them. Perhaps it will also provide ears and a way of detecting changes in environments for robots and other machines. What other unforeseen implications could these technologies have for our future? Only time will tell…
-
Art-ificial Garfunkel
Will collaboration with AI replace the talentless side-kick?
Wouldn’t it be great if we didn’t need other people? If we could come up with a great idea for a song and didn’t have to share the credit with our mate Kev just because he “wrote all the music”? Fortunately the days of having to rely on socialising and working with other humans to make music may well be behind us. New tools using AI technology are primed and ready to remove those pesky homo sapiens from your workflow once and for all.
90s AI mastermind David Bowie showing off his word mixer-upper Now the idea of getting a helping hand with your compositions in the form of artificial intelligence isn’t as cutting edge as it might sound. David Bowie was trying his hand at it with “The Verbasizer” on his album ‘Outside’ back in 1995. Even further Bach (if you’ll pardon the pun) in 1957 AI was used to create chorales in the style of our man Johann Sebastian in the ‘Illiac Suite‘. Now with significant advances in technology it’s easier than ever to get a little help from an artificial friend on your new album.

photo from Birmingham Mail [Robot Band Z Machines Live In Concert] The selection of software available these days in the AI music market is pretty extensive. It seems most DAWs are employing it in some way or another from intelligent computer drummers to mixing and mastering aides. These new advances in technology are being utilised by a whole range of artists and companies to push the boundaries of new music, to come up with novel ideas or simply to cut down costs by removing expensive people from the production chain. Going even further than this companies such as Amper and AIVA are offering fully customisable AI composed music for companies, content creators and consumers.
AI generated rock music from AIVA It still seems like it’s going to be a little while until we have AI composers writing number one hits but with AI music passing turing tests perhaps it’s only a matter of time. What this means for musicians is hard to tell. Will AI serve as a helping hand to songwriters and producers or will it replace them entirely? Whatever the case it seems that we’ll be seeing the influence of artificial intelligence more and more in our music in the years to come.
-
3 Weird Recording Techniques That You Will Probably Never Need To Use… …Probably
We’ve all been there. We’ve tried every mic placement and DI combo under the sun and although the guitar tone is rich and crisp it just doesn’t have that indescribable “It” factor. Every technical trick and tip on how best to place our mics has failed us. It is in moments like this we need to put down the hand book, break free from the box and just do some weird shit. That wet and wobbly toilet bowl resonance you’ve always dreamed of is out there and waiting for you. You just have to take the plunge. So come on in, the water’s damn fine.
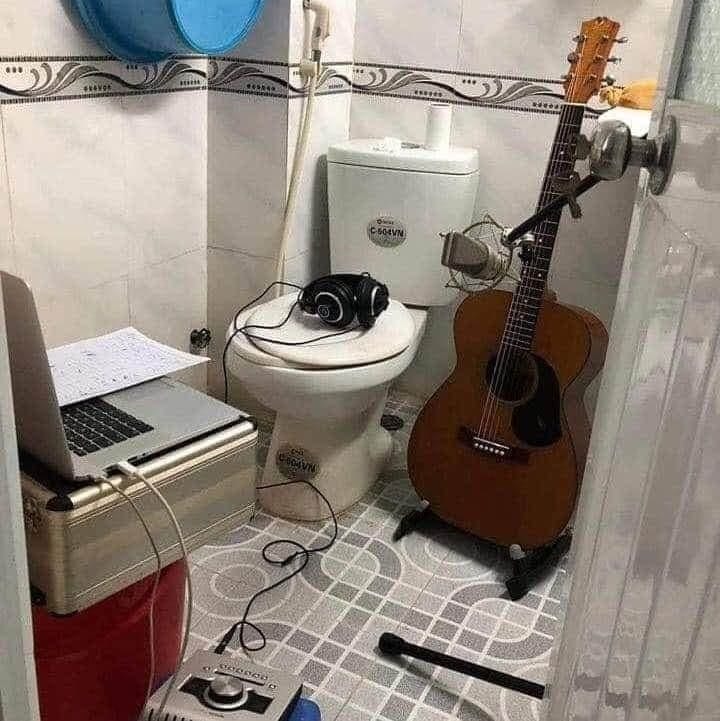
Record It In The Bathroom
An absolute classic to get the ball rolling. Who hasn’t listened to the bouncy mess of early reflections bombarding their ear drums as they sing in the shower after a long hard day and thought “Good god is this not the pinnacle of reverberation?”. Fortunately there is a simple way to bring that damp musky flavour to our recordings and it’s not going to break the bank!

This technique is simple, grab your favourite speaker, microphone and any other expensive electrical equipment you want to pile in to a literal water closet and get everything plugged in. Now you’re all set up play the recordings you want to drown in that swampy goodness through your speaker and record away. You’re going to want to experiment with different mic and speaker placements, so get creative. Does it sound better with the toilet seat up or down? How about if you pour a bubble bath? What if you hang a hydrophone in the toilet bowl and flush it as your track reaches the middle 8? Little changes like this can go a long way toward sculpting that perfect bathroom-verb.
I know at this point you’re sat at home thinking “What a load of crap!” or “Is this guy taking the piss?” but you can take your judgemental puns elsewhere. This technique has been utilised by some of the greatest recording artists ever to grace the music business. Just have a listen to undisputed banger “Start Me Up” by The Rolling Stones and tell me you don’t want a little bit of what they’re having.
The story goes that legendary mix engineer Bob Clearmountain achieved the sound by rerecording some of the vocal and drum tracks through a miked speaker in the bathroom at Power Station recording studio in New York where they added the final touches to the record.
So there you have it, a recording technique that’s not so bog standard to bring something different to your next mixing session. Just remember to crack a window before you get started.Record It Through Literal Rubbish

Picture the scene, it’s late on a Wednesday evening and you’re spent. You’ve been in the studio for hours and your recordings are sounding dull and lifeless. It suddenly occurs to you that Thursday is bin day and you’re yet to put them out. You jump at the excuse to get away from the desk and rest your ears. Upon lifting the tin and plastic recycling you freeze. Never has a more refreshing collection of crumples and clunks slid down your ear canals. You realise what your recordings have been missing all along. The sweet sweet sound of trash. Grab your snorkel, it’s time for a dumpster dive!

Where to begin with the veritable treasure trove of sonic possibilities contained within your run-of-the-mill refuse sack? Let’s look to the greats for some inspiration shall we? From Lennon and McCartney shouting captains orders through discarded baked bean cans on “Yellow Submarine” to Michael Jackson yelling through a cardboard tube in “Billie Jean” the influence of literal rubbish on popular music should not be underestimated. Even in the world of cinema garbage has been instrumental to some of our tastiest ear candy. Sound designer Ben Burtt made use of tubes from broken vacuum cleaners to record an LA freeway in order to create the whoosh of Luke Skywalker’s land speeder on Tatooine. Think not of your bin as merely a receptacle for empty cartons and forgotten dreams but as a portal to times long ago and galaxies far far away.
If you’re thirsty for a piece of the action then why not try making a microphone out of some random crap you’ve got lying around? You might create yourself a new bit of invaluable equipment and a bit of up-cycling might help offset the carbon footprint you’ve been building from all that energy draining studio gear.
Record It Spinning Round
Merry-go-rounds, roundabouts, ferris wheels, the mere mention of their names floods our heart with memories of the joyful revolutions of our childhood. If there’s one thing we as human beings love then it’s rotating on a variety of axes! It seems our perpetual orbit of a nuclear sphere coupled with the incessant gyrations of the big blue rock we call home have inadvertently developed an affinity for all that spins deep within the blood that circulates our meaty husks.
Now that’s all well and good but how can we utilise this endless sea of twirling whirlies? The possibilities are truly endless. Take guitarist Nels Cline of Wilco as a prime example. Whilst recording a guitar part for his track “Harbour Child” with his experimental jazz group The Nels Cline Singers he decided he needed a sound with some real swirl to it. Most musicians would just reach for the tremolo but not our man Nels. Always a maverick Nels recorded a guitar loop and then lifted his amp above his head swinging it gleefully between two stereo microphones. The result? a sound that’s second to none in terms of true swirl.
Don’t worry if spinning an amp round your head isn’t for you though. There’s plenty more ways to incorporate a bit of circular motion into your recording session. Perhaps you’d be more at home swinging the microphone round on a cable? Or maybe the sound you’re looking for can be achieved by running round and round a binaural head whilst tooting on that ocarina your mum got you for Christmas? Whatever your flavour there’s a rotary recording technique out there for you! So there we have it, a list of weird recording techniques you will almost definitely never need. I truly hope that this post has opened your mind to the deep and majestic sonic possibilities of doing strange stuff. If you’ve got any wacky ideas of how I could jazz up my sound then please let me know in the comments below!
-
Subscribe
Subscribed
Already have a WordPress.com account? Log in now.
